Well done on making it through a frosty winter into the delights of Spring! By now, you’re surely desperate to get back to carefree summer days, basking in the sunshine. In the meantime, why not give your outdoor pool area a much-needed makeover?
We’ve put together a list of fun do-it-yourself projects that are both cost-effective and quick – in just one afternoon. Whether you're looking to upgrade your style or make life more organized, these DIY projects will inspire you to get outside and enjoy the fresh air.
#1 – Pallet Pool Bench
After a refreshingly cool dip in the pool, it feels great to towel off and lie down to soak up the sunshine – which is why it’s imperative to have the best seats out of the house. Pallets make great outdoor furniture, like the bench mentioned below. With a little elbow grease and some tools, you have a brand-new pool bench. Pallets can also be easily sourced for free from local businesses or supermarkets – a win for sustainability! If you aren’t keen on getting into building mode, inflatable lounges and recliners work superbly as impromptu deck chairs.
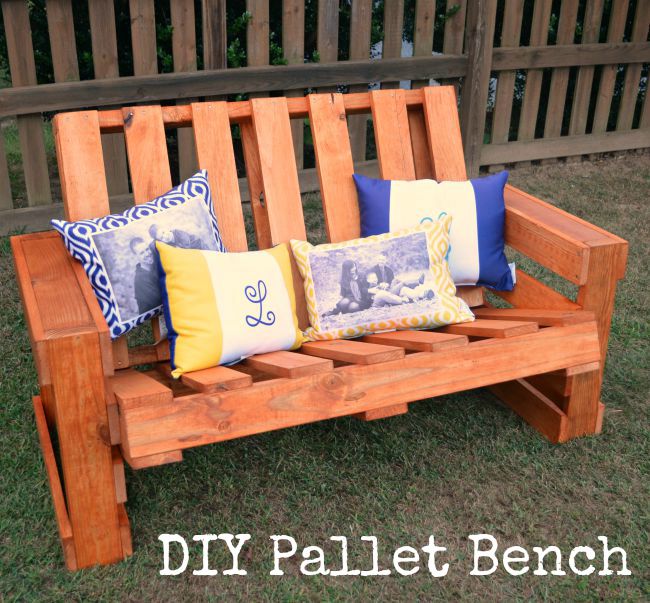
Image Source: Amy Latta Creations
What You Need
- Pallet
- 90 x 45 Treated pine
- Bugle batten screws
- Circular saw
- Hammer
- Impact driver
- Tape measure
How to DIY
- Prepare the pallet by using a tape measure to mark 430mm from the top of the pallet on both sides and center rail on the pallet. Remove the center slat below your marking with a hammer and remove the nails. The center rail can be put aside and used later for handrails.
- Use your circular saw to cut both the sides and the center rail of the pallet. You will now have a backrest (shorter section) and a base (longer section). Make sure you have four legs that will also double as handrail supports, using 90 x 45 treated pine at 550mm.
- Assemble the bench by propping up the base at a slight angle. Then adjust according to your preferences.
- Keeping the bench legs firmly square to the ground, screw the legs on with the bugle batten screws. On the back two legs, ensure you screw into both the seat base and seat back to ensure stability.
- Using the center slat removed earlier, cut to it to the desired length for handrails.
- Predrill the holes in the handrail and use bugle battens to screw them into place. If you need an additional slat, you can take one from the rear or underside of the bench.
- Finish by sanding and staining your bench. For a helpful play-by-play, check out the video tutorial.
#2 – Pool Path Perfection
While your above ground pool is gearing up for its debut, it’s the perfect time to create a pathway to and from the pool area. Doing this not only looks beautiful, it protects the garden, and prevents feet from getting grass in your pristine water. There are various materials you can use for the path itself, including stones, mulch and gravel. For a more creative aesthetic, you can use square concrete slabs and, with a stencil of your choice, spray paint them silver to create an artistically paved pathway.
P.S. Once the path has been laid, place a foot bath at the front of the pool ladder for an extra rinse – keeping your pool water even fresher and debris-free.
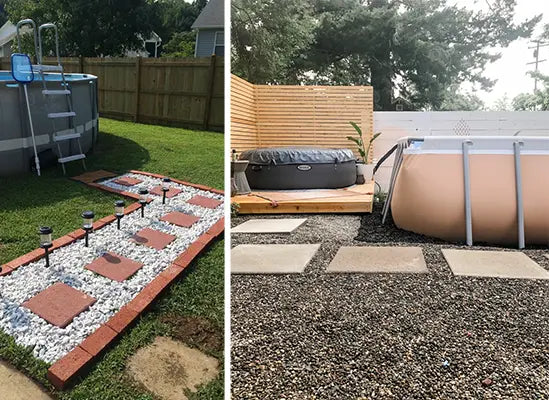
Image Source: Pinterest & The Spaces Between
#3 – Super Storage
During summer, kids definitely know how to maximize their pool time with games, toys and novelty floats. Although once the fun’s done, the dreaded mess remains. With another trusty wooden palette as an organizer, your storage woes will be over. Pool noodles, towels, goggles and water toys all have a safe place to live, keeping the pool area tidy and your sanity intact!
What You Need
- Wooden pallet
- Paint
- Coat hooks
- Drill and screws (optional)
How to DIY
- Paint your pallet in a color of your choosing.
- Attach the coat hooks to the top of the slats.
- Use your drill and screws to secure to the fence.
- You can also prop the palette against a wall.
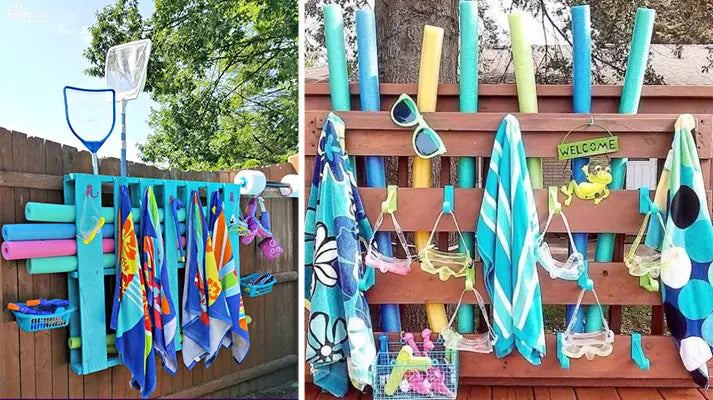
Image source: Brit.Co & Juggling Act Mama
#4 – Shade Upgrade
Embracing the cool shade in your above ground pool area not only protects you from the sun's harsh rays, but also adds to the overall comfort and aesthetics of your outdoor space. There are several options available for adding shade to complement your outdoor pool area.
Shade Sail
These rectangular or triangular canopies are the simplest way to create ample shade, providing effective sun protection and maintaining cool air circulation. They can be suspended between poles or anchored to walls and fences, creating a sleek uncluttered look. Shade sails come in various sizes and colors, so you can easily customize your coverage.
Pergola
For a more permanent shade solution, a pergola is a fantastic addition to your outdoor space. These freestanding structures have open-beam roofs that provide partial shade. They can be constructed from various materials, such as wood or metal, and can be customized to fit your space and design preferences. Adding climbing plants or vines to the pergola can improve shade coverage, while creating a naturally lush look and feel.
Adjustable Awning
If you prefer more flexibility in controlling the amount of shade, an adjustable awning might be the ideal choice. These awnings can be extended or retracted, so you can adjust the amount of shade throughout the day. They come in different styles, sizes, and fabrics, offering a wide range of options to match your pool area's aesthetics. Adjustable awnings provide instant shade and protection from the sun, meaning you can enjoy being outside even during the sunnier times of day.
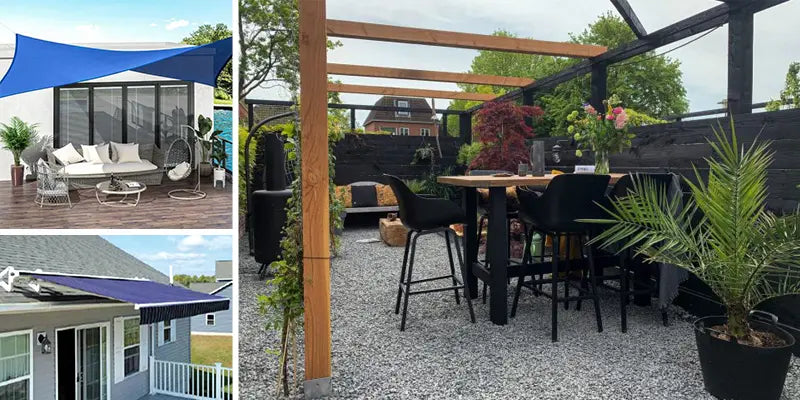
Image source: HGTV, Jellina Detmar & Shade & Shutter
#5 – Light Up the Night
The fun doesn’t need to stop once the sun goes down. Installing outdoor lights can ensure you enjoy your backyard pool area all day and well into the night. These Mason jar lanterns are easy to assemble and emit a gorgeous glow wherever they’re placed. Using solar-powered LEDs means you have both a sustainable and cost-effective option for nighttime entertainment. These Mason jar lanterns can even brighten up the path to your above ground pool with their soft twinkling.
What You Need
- 12-ounce wide mouth Mason jars
- Solar LED stake lights
- Super glue
How to DIY
- Remove the jar’s flat lid and keep the jar ring.
- Twist the LED light to remove the stake and keep the solar panel with the LED light.
- With the LED light facing up, apply a thin layer of glue around the edge of the panel.
- Press the panel gently down into the jar ring until it fits snugly.
- Wait for the glue to dry for at least one hour.
- Screw the jar ring with the LED light back onto the jar.
Pro Tip: If you want a little extra flair, fix pieces of colored paper onto the LED lights and watch these lanterns glow in color.

Image source: Crafts by Amanda
After reading through these awesome at-home projects, you’re probably feeling that familiar spark of inspiration to get creative in your backyard. Whichever DIY road you go down, we hope it gives you an even more gorgeous outdoor space to float some fun.